

10 Motor Skill Activities for Active Kids

A lot of parents are in the same spot right now. Your child wants to move. They want to kick a ball, race across the yard, throw something, hop off the sidewalk, or join a game with older kids. But the activity either feels too easy, too hard, or too chaotic to help them build skill.
That's where good motor skill activities make a difference. The best ones don't push kids into perfect technique too early, and they don't leave progress up to random free play alone. They give children just enough structure to practice balance, coordination, locomotion, and object control in ways that still feel like play.
That matters because motor development follows a broadly predictable pattern. A major WHO motor-development study established global windows of achievement for six gross motor milestones and found that about 90% of children achieved five of the milestones in the same developmental sequence, with only 4.3% not exhibiting hands-and-knees crawling, which helps explain why movement-based play is such a practical way to support development and skill tracking across ages WHO motor development milestones.
Below, you'll find 10 motor skill activities organized across foundational balance, locomotion, object control, and sport-specific play. Each one includes a simple setup, coaching cues, age-based progressions, equipment swaps, safety checks, and a short mini-session idea you can use at home, in a driveway, at a park, or indoors.
If you're in Humble, Kingwood, Atascocita, or nearby Houston communities, you'll also notice how these same building blocks connect naturally to age-appropriate sports instruction. JC Sports Houston is one local example of a program that uses progressive teaching, small-sided play, and skill-building across multi-sport classes, Coerver-based soccer training, BlastBall, leagues, and camps. The point isn't to rush kids into organized sports. It's to match the challenge to the child, then let confidence grow from repetition.
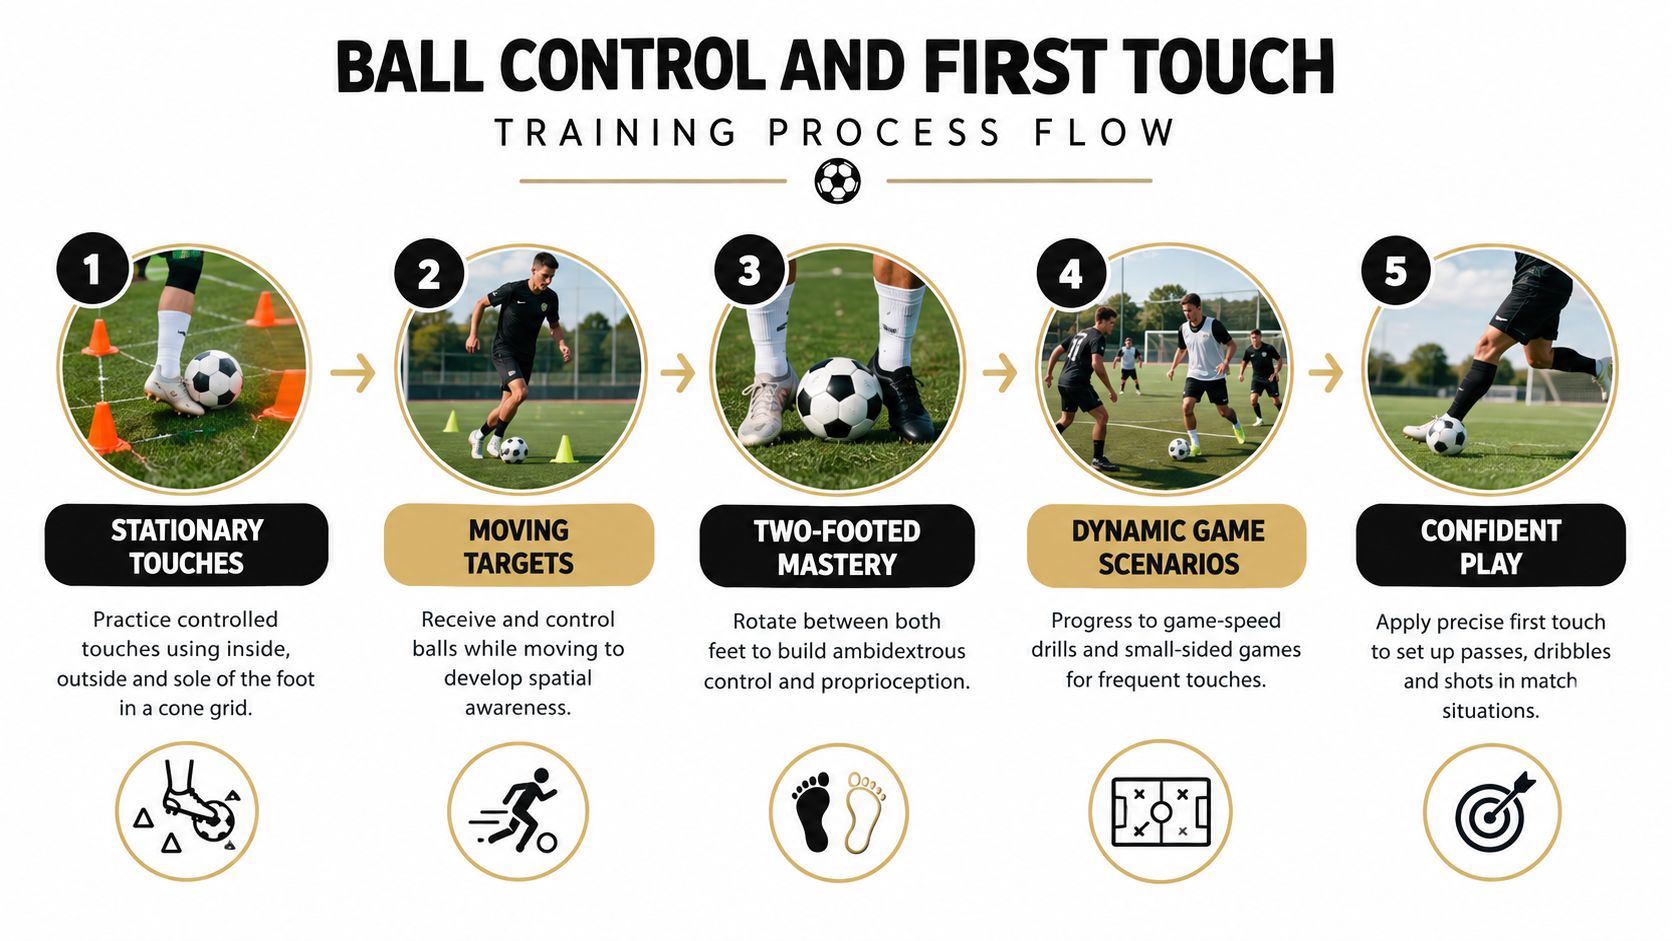
1. Ball Control and First Touch Training
A soccer ball can look simple, but for young kids it's a moving balance challenge. They have to track the ball, place the foot correctly, control force, and recover body position after each touch. That's why ball control is such a strong motor skill activity for coordination and timing.
Start with a small square marked by cones, shoes, or water bottles. Give your child one ball and ask for tiny touches with the inside of the foot, then the outside, then the sole on top. Keep the ball close enough that they could stop it in one step.
Simple cues that work
Use short language kids can remember.
Inside touch: Push the ball like you're passing it to yourself.
Outside touch: Nudge it and chase one step.
Sole stop: Freeze the ball like a statue.
Eyes up: Peek forward, then back to the ball.
For toddlers and young preschoolers, forget speed. Let them trap the ball, stop it, and restart. For older preschoolers and school-age kids, add a parent pass so they can practice receiving, settling, and sending the ball again.
Keep the first touch soft enough that the next movement is still available.
JC Sports Houston's Coerver-based soccer work uses this same ground-up approach. Instead of starting with big games and hoping skills appear, kids repeat small touches until the feet and brain start working together more naturally.
Progressions, swaps, and a mini-session
If you don't have a soccer ball, use a playground ball, a foam ball, or even a rolled pair of socks indoors. If the ball keeps getting away, make the space smaller. If the child looks bored, open the space and add a target gate to dribble through.
Ages 2 to 4: Stop the ball, tap it forward, stop again.
Ages 4 to 6: Alternate right foot and left foot touches.
Ages 6 and up: Receive a pass, turn, dribble through a gate, then pass back.
Safety is simple here. Use a flat surface, move breakables, and keep the ball size manageable for the child's stride length.
A good 8-minute mini-session looks like this: 2 minutes of sole stops, 3 minutes of inside-outside touches, 3 minutes of receive-and-pass with a parent or sibling.
2. Agility Ladder and Footwork Drills
A strip of painter's tape down the hallway can turn into a footwork path fast. One child tiptoes through it like they are crossing a river of hot lava. Another rushes, tangles their feet, and laughs. Both are practicing the same skill. How to place the feet on purpose while the rest of the body stays organized.
That matters in every category of movement. Balance keeps the trunk steady. Locomotion carries the child through the pattern. Object control shows up later, when the same feet have to move around a ball, a glove, or a bat. Sport-specific play grows out of those basics.
Set up six to ten spaces with tape, chalk, towels, or pool noodles. Keep each space large enough for the child's stride. If they look cramped, widen the boxes first.
A good first cue is simple: land softly and finish each step before the next one starts.
Instead of piling on patterns, teach one path and let the child feel the rhythm.
Try these home-friendly options:
Walk and place: One foot in each box
In-in, out-out: Two feet in the box, then two feet outside
Side steps: Face sideways and step through without crossing feet
Two-foot hops: Jump into each space and stick the landing
Fast feet finish: Move through the ladder, then stop under control on a cone or spot marker
You can coach each one with plain language: “Quiet feet.” “Eyes forward.” “Belly button stays tall.” “Arms help you.”
That last cue gets missed a lot. Kids often lock their arms at their sides, then wonder why they wobble. Free arm swing works like a counterbalance. It helps the legs move faster without the whole body tipping around.
Age changes the goal here.
For ages 2 to 4, the ladder is really a balance and body-awareness activity. Let them step over lines, freeze in a box, or hop into one square and hold still. For ages 4 to 6, use short patterns they can remember, such as in-in, out-out. For ages 6 and up, add a finish task: turn, sprint two steps, pick up a beanbag, or receive a gentle pass.
If you want to connect these home patterns to sport, make the ending match the game. A soccer player can ladder through, then tap a ball forward. A BlastBall beginner can ladder through, then run to a base. A basketball player can finish with a defensive slide. That same idea shows up in JC Sports Houston multi-sport classes, soccer training, leagues, and camps, where footwork is practiced in small pieces before it is used in play. Families who want to see how these patterns carry onto the field can use this guide to agility training for soccer.
Safety checks are quick. Tape should lie flat. Towels should not slide. Shoes should match the surface. Stop if the child starts stomping, twisting the knees inward, or losing balance at the end of each pattern. Clean reps beat rushed reps.
Here is one mini-session that works well at home:
2 minutes: Walk forward through the ladder, then backward
3 minutes: Pick one pattern and repeat it with calm, controlled feet
2 minutes: Add a side-step pattern
3 minutes: Finish with ladder plus one sport action, such as a short dribble, base run, or beanbag pickup
The goal is not to look fast. The goal is to become organized first. Speed comes later, and it comes more easily when the feet already know where to go.
3. Cone Weaving and Directional Changes
A child rushes toward the first cone, cuts too sharply, and the whole body tips sideways. That moment is useful. It shows exactly what directional-change work trains: how to brake, line the body up again, and leave the turn under control.
Cone weaving is really a lesson in steering. Straight-line speed is only one piece. In soccer, basketball, baseball, and playground chase games, kids have to decelerate, shift weight, and re-accelerate without getting tangled up.
Set up a lane with four to six markers. Cones work well, but cups, shoes, stuffed animals, or water bottles can do the same job. Start with wide gaps so the path looks obvious. If the child keeps clipping markers, the setup is asking for too much too soon.
Use these coaching cues while they move:
Plant the outside foot.
Point the chest toward the next opening.
Push the ground away.
Keep eyes up for one marker ahead.
Take small steps into the turn, then longer steps out.
Those cues matter because children often hear “go around the cone” and solve the problem with only their feet. The turn gets cleaner when the whole body joins in. Hips, shoulders, eyes, and feet need to agree on where the next step is going.
One simple way to teach that is to pause the pattern. At each cone, have the child stop, face the next gap, then go. It works like tracing letters before writing them quickly. First the shape becomes clear. Then speed starts to make sense.
Age changes the goal.
For ages 3 to 5, make it a trail game. Walk around “trees” or “sleeping animals,” pause at each one, and finish with a straight run to a safe spot. The win is body control, not sharp cutting.
For ages 6 to 8, use a jog and add one decision. Call out “reverse,” “skip one,” or “touch and go.” Now the child is not just weaving. They are reading, adjusting, and organizing the body under a small bit of pressure.
For ages 9 and up, tighten the spacing slightly or add a sport action after the final cone. Soccer players can take two dribbles out of the turn. BlastBall beginners can round the last marker and run through a base. Basketball players can weave, then close out or slide.
Here is a home mini-session that does not feel repetitive:
Start with shape, 3 minutes. Walk the weave once. Jog it twice. Pause briefly at each cone.
Add one challenge, 3 minutes. Go sideways through the lane, or carry a beanbag, small ball, or rolled pair of socks.
Finish with a purpose, 4 minutes. Weave, exit fast for five steps, then complete one sport action. Dribble, throw to a target, or run to a base marker.
That same pattern shows up in JC Sports Houston multi-sport classes, Coerver-based soccer sessions, BlastBall, leagues, and camps. The version at home is just smaller and simpler. The movement idea stays the same: organize the turn first, then connect it to play.
Safety is mostly about space and pacing. Leave extra room past the last cone. Use a dry surface. Check that the child is not twisting the knee inward or leaning so far that each turn becomes a stumble. If that happens, widen the lane, slow the entry, and return to the pause-at-each-cone version.
A good weave looks calm before it looks quick. That is the marker to watch.
4. Small-Sided Games and Modified Play
A full game can swallow a young player. One child chases the action, another waits, and a third barely touches the ball. Shrink the space, lower the numbers, and the game starts teaching.
That shift matters because small-sided play blends movement and decision-making at the same time. A child has to notice space, slow down, turn, pass, protect, and try again a few seconds later. It is practice disguised as play, but it feels more like a backyard challenge than a drill line.
Here is a simple way to set it up at home.
For soccer, try 2v2 with two small goals and no goalie.For BlastBall-style play, use one striking spot and one base to run through.For basketball, play 1v1 or 2v2 to a cone gate or a low target area.For general coordination, use a tag game inside a marked square with two safe stop zones.
The common thread is repeat turns. More turns usually mean more chances to organize the body well.
Research on physical activity and motor-skill development points in the same direction. A 2020 systematic review found that 25 randomized controlled trials tested physical activity interventions for children's motor skills, and 20 of the 25 reported significant improvement, though effect sizes varied widely by intervention format and follow-up period. The review also noted stronger results in many traditional activity formats than in exergaming formats systematic review on physical activity and motor skills.
Ages change the design more than the goal.
For ages 3 to 6, keep the game almost effortless to understand. Score by dribbling through a gate. Run to one base and stop on balance. Toss, catch, and step over a line to earn a point. The child should be able to start within seconds, not stand there decoding rules.
For ages 7 to 9, add one layer. Two passes before a score. Change direction after every point. Use a smaller field so turns come faster.
For ages 10 and up, add choices instead of just adding speed. One team may need to switch targets after a score. A stronger player may have a two-touch limit. Those rule changes ask for control under pressure, which is part of what later sport play demands.
A quick home mini-session can flow like this:
Minutes 1 to 3: warm up with free play in the spaceMinutes 4 to 7: add one rule, such as pass through a gate before scoringMinutes 8 to 12: play the short game and pause once or twice for a reset cue
Use cues a child can act on right away. “Find space.” “Small steps.” “Eyes up, then go.” Short coaching works better than a running lecture during play.
Safety checks are simple but important. Mark clear boundaries. Keep enough run-off room near walls, furniture, or fences. Use a softer ball indoors or in tight spaces. If collisions start happening, the area is too crowded, the rules are too complex, or the pace is ahead of the child's control.
Equipment can stay basic. Cones can be shoes, chalk marks, or paper plates. A goal can be two water bottles. A base can be a towel or flat disc marker. What matters is that the targets are easy to see and the child can keep moving.
This home version lines up closely with how children often learn in JC Sports Houston multi-sport classes, Coerver-based soccer training, BlastBall, leagues, and camps. The format is different from a full game for a reason. Smaller groups create more touches, more reads, and less waiting, which helps beginners build real game habits without getting lost in the crowd.
If one child controls everything, give them a narrower channel, a weaker-foot rule, or a pass-first condition. If a child hangs back, start with an adult partner, shorten the distance to success, and let the first win come quickly. Small-sided play works best when every child stays involved often enough to learn from the next attempt.
5. Dribbling and Ball Manipulation Games
A child with a ball at their feet is solving little movement problems every few seconds. How hard should I tap it? Where is the open space? Can I stop before I run into the chair, cone, or sibling? That is why dribbling games do more than teach soccer skills. They sharpen touch, timing, body control, and quick decisions at the same time.
They also scale well at home. A rolled-up pair of socks works in the living room. A playground ball or soccer ball works outside. The goal stays the same. Keep the ball close enough to guide, but loose enough to move.
One easy way to teach that idea is to change the mission, not give a long speech. On one round, your child sneaks through gates. On the next, they rescue beanbags from a "treasure island." Then they try a sharks-and-minnows version with a light defender. The game changes. The movement lesson stays.
A shy preschooler who freezes in bigger group play often does better with solo gate dribbling first. They get many small wins without having to defend, pass, and score all at once.
Use simple coaching cues they can feel in their body:
"Little taps"
"Foot next to the ball"
"Stop it, then go"
"Peek up, then dribble"
Age matters here. Toddlers and young preschoolers usually need a larger, slower ball and short paths. Older beginners can handle turns, stop-start commands, and simple challenges with one foot. Children who want more can react to color calls, race to a target gate, or protect the ball from gentle pressure.
If you want a quick home setup, try this 8-minute mini-session.
Minutes 1 to 2: free dribble in a small squareMinutes 3 to 5: dribble through two or three gates, then freeze on commandMinutes 6 to 8: collect soft objects one at a time while keeping the ball nearby
That short format mirrors a lot of what happens in JC Sports Houston multi-sport classes and Coerver-based soccer training. Children get repeated touches before the activity asks for more speed or more decisions. In BlastBall, leagues, and camps, the ball may change and the rules may look different, but the same base skill shows up again. Control the object, adjust your steps, and react without losing balance.
A few substitutions make these games easier to run. Cones can be shoes or paper plates. Treasure can be stuffed animals, beanbags, or even clean socks. If the ball keeps shooting away, shrink the space or swap to a softer ball. If your child stares down the whole time, place bright targets ahead so looking up has a purpose.
Safety is mostly about spacing and surface. Clear the corners of low tables indoors. Skip slippery socks on hardwood if your child cannot stop well yet. Outside, check for holes, wet patches, and driveway slopes that make the ball roll too fast.
Coaching gets better when you match the challenge to the child in front of you. Some children need fewer obstacles and more success. Others need a job to solve, like "turn away from pressure" or "use the other foot on the way back." Ball manipulation games work best when the task is clear, the space is safe, and each round gives the child one thing they can do a little better than before.
6. Balance and Coordination Activities Including Balance Beams and Single-Leg Exercises
Balance often looks quiet, but it powers everything else. A child who can hold posture on one foot usually turns better, lands better, and handles balls better too. That's why balance work belongs in any good list of motor skill activities.
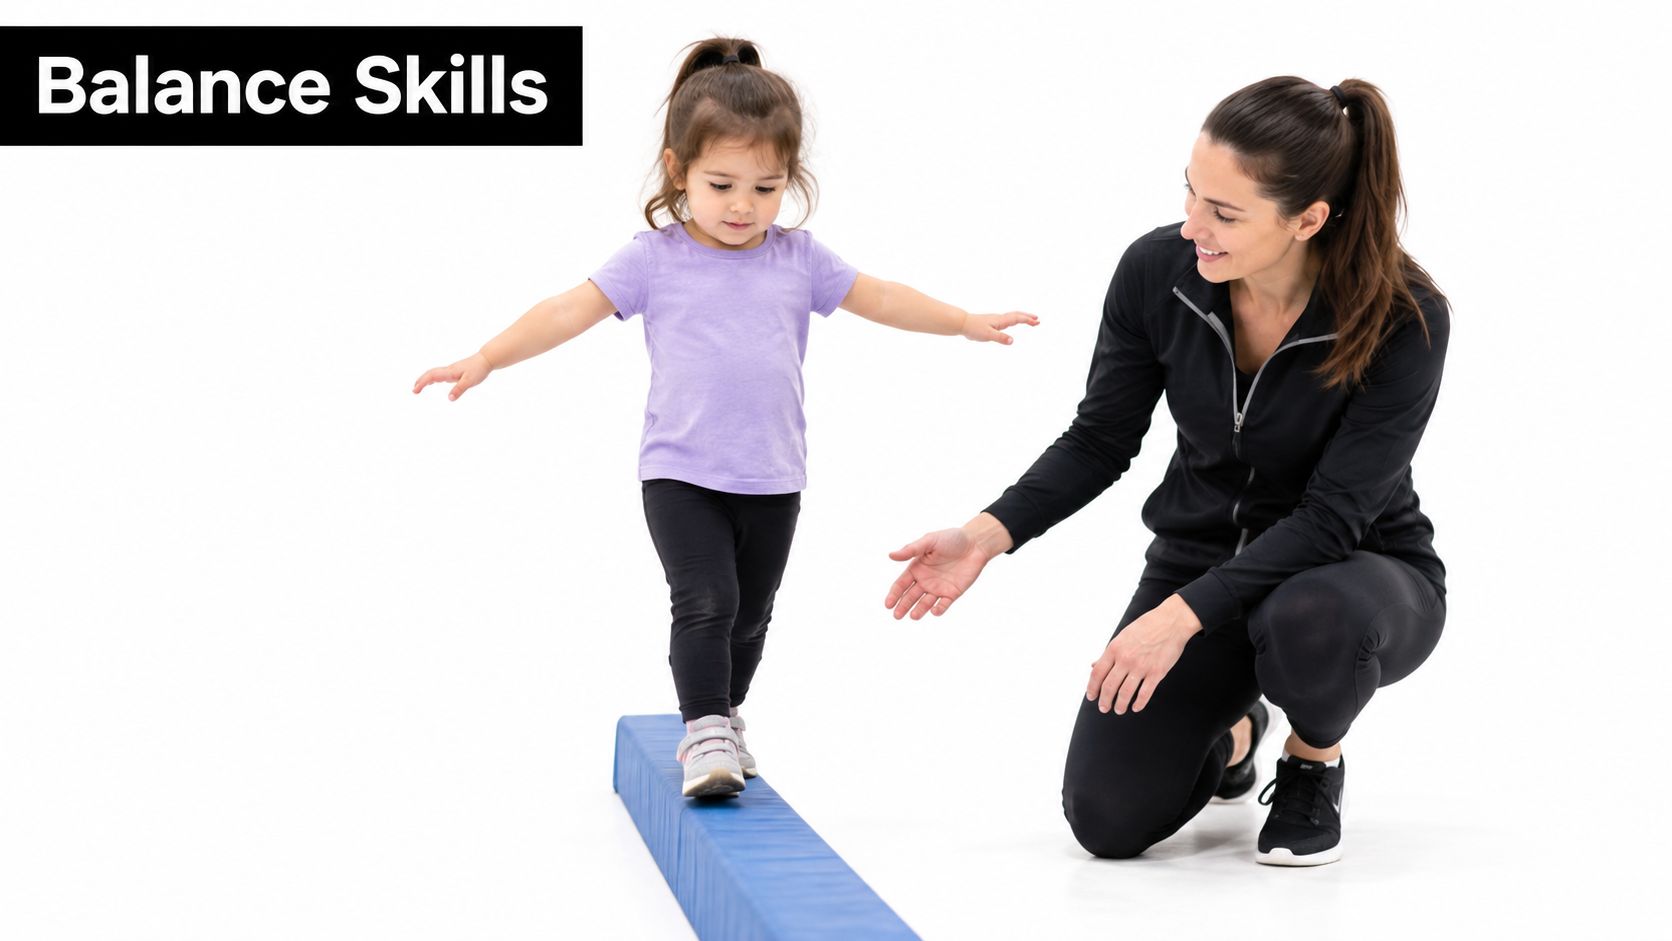
A follow-the-line setup is enough to begin. Put painter's tape on the floor, use a crack in the sidewalk, or place a low beam, board, or folded mat on the ground. Ask your child to walk heel-to-toe slowly with arms out.
For more home-friendly ideas, this article on balance exercises for kids pairs well with beam walks, one-leg stands, and simple coordination games.
Easy balance progressions
Start wide and low. Then narrow the challenge.
Level 1: Walk a line
Level 2: Pause and hold one foot up
Level 3: Step over small objects on the line
Level 4: Balance while tossing a scarf or soft ball
For toddlers, make it pretend play. “Cross the bridge.” For preschoolers, add animal poses. For school-age kids, try single-leg reaches or hop-and-stick landings.
A follow-up study of children ages 3 to 6 from middle-income families found that locomotor and object-control skills continued to grow, with annual growth rates of 20% and 30%, and that motor-skill development was significantly associated with playing with friends and doing varied activities such as bicycling, skateboarding, dancing, running, and jumping, while household income, parental education, toys, and home play space were not significant drivers study on activity variety and motor skill growth.
That's a helpful reminder. Kids don't need a perfect setup. They benefit from movement variety and shared play.
Safety and practical gear swaps
A taped line is safer than a raised beam for many young children. A couch cushion can become a stepping island. A pool noodle can become something to step over. If your child is also working on riding skills, practical gear fit matters too, especially when families are finding the right child bike size.
A quick 8-minute session could be line walk, single-leg hold, step-over path, then beanbag toss while balancing. Keep the mood light. Wobbling counts as learning.
7. Passing and Receiving Combinations
Passing looks social, but it's also a coordination puzzle. A child has to judge distance, angle the foot or hands, absorb force, and then send the object somewhere useful. Receiving might be even more important. If the first contact is wild, the next action disappears.
That's why simple passing combinations belong in regular practice, especially for kids starting soccer or any ball-based team sport.
Build the rhythm first
Start close. One child, one parent, one ball. Pass, stop, return. Then add movement.
Stationary pass and trap: Send it gently, stop it, send it back.
Pass through a gate: Use two cones as a target.
Pass, move, receive: After passing, shuffle to a new spot.
Triangle passing: Use three players or two players and one rebound wall spot.
Use short cues. “Soft first touch.” “Point your plant foot.” “Show your hands” for catching versions. Children learn better when they can repeat one clear action many times before layering in the next one.
Good receiving makes passing look smarter than it really is.
That's true in the backyard and in organized play. A child who settles the ball calmly often looks more advanced because the sequence stays under control.
Progressions and session ideas
Preschoolers can roll and stop a ball before kicking. Early elementary kids can pass with the inside of the foot through cone gates. Older or more confident players can alternate one-touch and two-touch patterns.
A parent-guided study in preschool children found that a 12-week mHealth intervention improved motor skill proficiency compared with an app promoting free play, and the gains were still present at 6 months, which supports simple, structured home coaching over fully unstructured activity parent-guided motor skills intervention study.
A useful mini-session:
2 minutes: roll and trap
3 minutes: short passing through a gate
3 minutes: pass, move, receive
2 minutes: tiny challenge, such as five clean passes in a row
Use a softer ball indoors. Outdoors, face away from windows and streets. Keep the distance close enough that technique stays tidy.
8. Jumping, Hopping, and Plyometric Exercises
Jumping is one of the clearest ways to see motor control. You can spot timing, balance, confidence, and landing skill in one rep. Kids also love it, which makes it easier to practice often.
For younger children, use playful prompts. Jump like a frog. Hop like a bunny. Land like a quiet cat. For older kids, you can start cleaning up mechanics with simple cues about knees, arms, and soft landings.
Landing matters as much as takeoff
Many children can get off the ground before they can land under control. Teach the finish first.
Soft knees: Don't land stiff.
Feet apart: Give the body a base.
Quiet landing: Try to make less noise.
Freeze after landing: Hold the position for a moment.
A great beginner sequence is jump over a line, freeze, then turn and do it again. Hopping on one foot comes later because it demands more balance and strength.
If a child collapses inward, swings wildly, or can't stop after landing, lower the challenge. Use floor lines instead of hurdles. Use broad jumps over pillows or chalk marks before trying repeated hops.
Age progressions and playful formats
Toddlers can step and hop off a low line with hand support. Preschoolers can do two-foot jumps over noodles or tape. School-age children can work on hopscotch, forward hops, side-to-side jumps, and jump-then-catch combinations.
Recent reviews described in a Frontiers discussion of the field argue that motor development-focused training appears to enhance gross motor skills more effectively than ordinary physical activity in preschoolers, while also noting that better standardized assessment tools are still needed for real-world use review on gross motor skills, social development, and training specificity.
That lines up with what coaches and families often see. “Just run around” isn't always enough. A child improves faster when the movement target is clear.
Use grass, mats, or another forgiving surface. Avoid repeated jumping on concrete for beginners. A short 6-minute block is usually enough before form fades.
9. Hand-Eye Coordination Drills and Catching Games
Catching games can start very early, long before a child is ready for formal baseball or basketball. The key is matching the object and speed to the child's current comfort level.
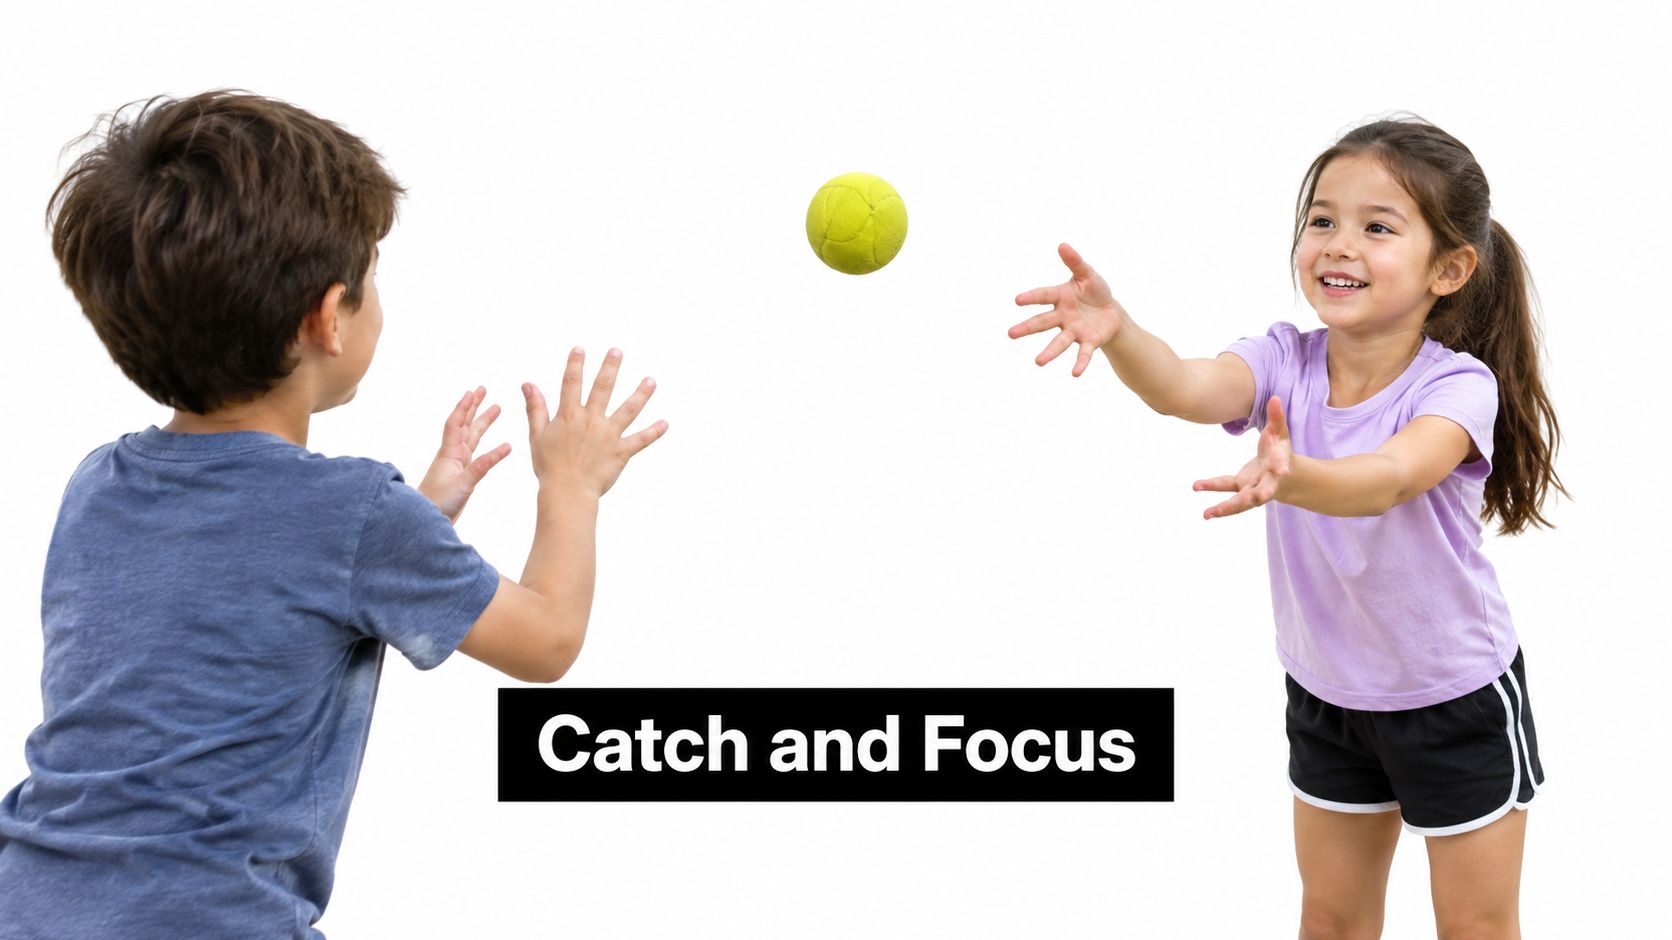
A balloon is often the best first “ball.” It moves slowly, gives the eyes time to track, and lets children practice reaching without fear of impact. From there, move to scarves, beach balls, soft foam balls, and then smaller objects as control improves.
Catching starts before actual catches
Some children need several earlier steps.
Track it: Watch the object all the way in.
Trap it: Catch against the chest first.
Two hands ready: Make a basket or big window.
Toss softly back: Control the return too.
You can also build hand-eye work with wall rebounds, bounce-and-catch games, or “catch after one clap” challenges for older kids. BlastBall-style beginner baseball sessions often use exactly these progressions because they lower fear and increase successful reps.
A family that likes party-style play can even borrow simple toss station ideas from places that rent carnival games in Surrey, then adapt them at home using buckets, beanbags, and soft balls.
Age-based progressions and safe setups
Toddlers can catch scarves or pop bubbles with two hands. Preschoolers can catch a balloon, then a beach ball, then a soft foam toss from a short distance. School-age children can move while catching, catch after a bounce, or react to left-right calls.
Keep these sessions short and upbeat. Five clean catches may be a huge win for one child and too easy for another. The right level is the one that produces effort without panic.
A simple mini-session:
2 minutes: balloon taps
3 minutes: toss and trap
3 minutes: catch and return
2 minutes: target toss into a bucket
When in doubt, use the softer object and shorter distance. Confidence grows faster when the hands meet success early.
10. Running Mechanics and Sprint Drills
Kids run naturally, but they don't always run efficiently. Some shuffle with tiny steps. Some twist their torso. Some stop and restart without any control. A few short running drills can clean that up without making the session feel like track practice.
Think of running mechanics as movement organization. Arms, knees, feet, posture, and rhythm all need to cooperate.
Keep the cues short
Most children won't respond to technical sprint language. They do respond to vivid, simple reminders.
Pump your arms: Elbows move, hands relax.
Tall chest: Don't fold over.
Quick feet: Push the ground and go.
Freeze the finish: Learn to stop under control.
Good starters include marching, high knees, butt kicks, and short accelerations over a small distance. For younger children, turn these into animal or superhero runs. For older kids, use clear start and stop points.
For families who want more examples, JC Sports Houston also shares sport-friendly speed training exercises that pair well with short home drills and camp-style movement circuits.
Here's a visual example to pair with the cues above.
Progressions, age bands, and mini-sessions
One of the biggest mistakes is expecting children of very different ages to respond to the same sprint drill. Evidence summarized in a review on practical guidance for motor skill activities noted that a 2025 study of 424 children ages 2.5 to 6 found meaningful gross motor differences even within 6-month age bands, which suggests age-specific activity design matters more than many generic guides explain review discussing age-specific activity design and research gaps.
So keep the progressions narrow:
Toddlers: run to a cone and stop in a hug pose
Preschoolers: march, skip, then sprint a short line
School-age kids: drill, accelerate, decelerate, turn back
Use grass, turf, or another safe open space. Check for holes, slippery spots, and nearby traffic. End before form falls apart. Sharp, short reps beat sloppy long ones every time.
Comparison of 10 Motor Skill Activities
Activity | 🔄 Implementation Complexity | ⚡ Resource Requirements | 📊 Expected Outcomes | 💡 Ideal Use Cases | ⭐ Key Advantages |
|---|---|---|---|---|---|
Ball Control and First Touch Training | Medium, progressive drills, coaching needed | Low, ball, cones, small space | Better first touch, ambidexterity, ball confidence | Individual practice, small-group technical sessions | Fundamental skill with high game transfer |
Agility Ladder and Footwork Drills | Low–Medium, simple patterns to advanced sequences | Low, ladder, small area, indoor/outdoor | Improved foot speed, coordination, quickness | Warm-ups, multisport speed work, conditioning | Portable, immediate feedback, highly engaging |
Cone Weaving and Directional Changes | Medium, pattern design and coaching progression | Low, cones, adequate space | Sharper cuts, balance, change-of-direction control | Dribbling under pressure, agility progressions | Scalable difficulty, measurable via timing |
Small-Sided Games and Modified Play | Medium–High, requires game management and objectives | Medium, field/space, multiple players, coach oversight | More touches, faster decision-making, tactical growth | Match-readiness, tactical teaching, high-engagement sessions | Accelerates technical/tactical development, fun |
Dribbling and Ball Manipulation Games | Low, play-based with progressive constraints | Low, ball, cones, small area | Close control, creativity, handling under pressure | Early development, confidence building, small groups | Very engaging, quick confidence and touch gains |
Balance and Coordination Activities | Low–Medium, safety supervision and progressions | Very Low, beams/tape, simple props | Better proprioception, core stability, motor foundation | Toddlers/preschool, injury prevention, multisport prep | Safe, foundational across sports and ages |
Passing and Receiving Combinations | Medium, partner/group drills with progression | Low, balls, cones, minimum two players | Accurate passing, improved first touch, teamwork | Team drills, possession work, tactical patterns | Direct match transfer, measurable accuracy gains |
Jumping, Hopping, and Plyometric Exercises | Medium–High, requires progression and coaching | Low–Medium, boxes, safe surfaces, supervision | Increased explosive power, coordination, bone strength | Power development, older kids, multisport athleticism | Improves athletic performance; measurable progress |
Hand-Eye Coordination Drills and Catching Games | Low, simple to complex progressions | Very Low, balls/balloons, open space | Better tracking, reaction time, manual dexterity | Baseball/tennis foundations, preschool motor play | Fun, highly transferable, minimal equipment |
Running Mechanics and Sprint Drills | Medium, technical coaching important | Very Low, open space, cones, timing optional | Improved speed, efficiency, reduced injury risk | Speed work, warm-ups, multisport conditioning | Cross-sport benefits; easily integrated into sessions |
Turn Ten Activities Into a Weekly Movement Routine
The easiest way to use these motor skill activities is not to do all ten in one day. Most kids learn better with small doses, repeated often, than with one long session that leaves them tired, distracted, or frustrated.
A simple formula works well. Pick one balance or coordination activity, one locomotor drill, one object-control activity, and one short game-based finish. That gives your child enough variety to stay engaged while still repeating a few useful patterns.
For toddlers, keep sessions short and playful. A good mini-session might be tape-line walking, a few animal runs, balloon catches, then a treasure hunt where they carry soft objects from one spot to another. Stay close, demonstrate often, and use lots of stop-start moments. At this age, the goal is comfort with movement, not polished technique.
For preschoolers, you can tighten the structure a little. Try balance beam walks or one-leg holds, then cone weaving or simple ladder steps, then rolling or kicking passes, then a small game like gates dribbling or toss-and-run. Preschool children usually do best when each block feels like a challenge they can solve quickly. If attention starts drifting, switch activities instead of dragging the drill longer.
For school-age children, you can start combining skills more deliberately. A balanced session might include single-leg balance with a toss, agility ladder footwork, passing and receiving combinations, then a 2v2 game or a short relay with sport-specific tasks. This age group often enjoys goals, but keep them process-based. Ask for clean landings, softer first touches, or better stopping control instead of only counting points.
Space matters. A hallway may be perfect for line walking and soft catches but terrible for sprinting. A driveway may work for dribbling and passing but need extra rules around boundaries. A park may offer more room for running mechanics and small-sided games but require closer attention to surface changes and distractions. Match the activity to the setting, not the other way around.
Equipment matters less than people think. Painter's tape can replace a beam. Laundry baskets can become targets. Rolled socks can become indoor throwing tools. Plastic cups can stand in for cones. If the setup is simple, you're more likely to repeat it, and repetition is what turns awkward movement into usable skill.
Pacing matters too. If a child is successful and focused, stay with the activity a little longer. If they're missing every catch, tripping through every pattern, or asking to quit, scale it down right away. Make the target bigger. Slow the toss. Shorten the distance. Widen the cones. The best adjustment is usually the one that gives the child one clear win, then another.
It also helps to remember what the research still doesn't fully answer. The broader literature keeps pointing out that parents and educators want clearer guidance on what works best by age, setting, and format, but studies often use different assessments, different intervention doses, and inconsistent follow-up. In practice, that means you don't need to chase the “perfect” activity. You need a reasonable one that fits your child's readiness and that you can repeat consistently.
When families want coached progression, a structured class can make this easier. JC Sports Houston is one local option for families in Humble, Kingwood, Atascocita, and nearby communities who want age-appropriate instruction in a safe indoor setting. Their mix of multi-sport classes, Coerver-based soccer training, BlastBall, leagues, and camps lines up naturally with the kinds of movement foundations covered here. If you're considering a program, check the current schedule, age group, registration details, and trial options so the fit matches your child's stage rather than just their age on paper.
The big picture is simple. Build movement through play, repeat what works, and let skill grow one successful rep at a time.
If you want help turning these motor skill activities into a consistent routine, JC Sports Houston offers multi-sport classes for young children, Coerver-based soccer training, beginner-friendly BlastBall, leagues, and seasonal camps for families in the Humble, Kingwood, and Atascocita area. It's a practical next step when your child is ready for coached progressions, small-sided play, and a safe indoor place to keep building confidence through movement.
Comments